When removing a toilet, replacing the wax ring between the bathroom and the floor-mounted toilet flange (commonly referred to as a closet flange) is essential. The wax ring’s purpose is to create a water and air-tight seal that can withstand years of use.
This blog will provide a step-by-step guide on replacing a toilet wax ring and offer tips to ensure your project is executed correctly.
We want to remind you that while DIYing is admirable, some jobs require a licensed professional. Always be honest about your skill level and call for help when needed.
What to Consider Before Replacing a Toilet Wax Ring
- New Flooring: If you plan to replace vinyl flooring with something thicker, such as ceramic tile, this can create a gap between the toilet and the toilet flange. We recommend using a flange spacer to raise the flange to the proper height. Toilet flanges should sit on top of the finished floor.
- Check Your Toilet Flange: Does your toilet wobble from side to side? If your toilet rocks enough for one side of the base to lift off the floor — even just a bit — you may have a broken toilet flange. As a precaution, we recommend picking up a flange repair kit.
- Test Your Toilet’s Flapper: Fixing a leaky flapper can save hundreds of gallons of water. A good time to replace a leaky flapper is after you’ve drained the toilet tank and disconnected the water supply. To test the flapper before turning off the water, tint it in the tank with food coloring and let it sit for 10 minutes. If any colored water leaks into the bowl, replace the flapper.
- Check For Water Damage: If you are removing the toilet because of a leak at the base or water damage in the ceiling below, confirm the cause of the damage before heading to the store. Water can damage the subfloor enough to affect the strength of the fasteners attaching the toilet flange — and the toilet — to the floor. Determine whether you need to cut away the damaged subfloor and replace it.
- Inspect T-bolts: Anytime a wax seal is replaced, you should replace the T-bolts that attach the toilet to the flange. Some toilet wax rings come in a complete kit with new mounting bolts.
Phase 1: Drain and Remove Your Toilet.
To replace a toilet wax ring, you must first remove the toilet. To do this without making a mess, have a bucket, sponge, and towels nearby to catch water drips when you turn off and disconnect the water supply line.
Step 1: Turn off the Toilet’s Water Connection
Before replacing your toilet, please ensure the water supply is shut off. Typically, you can find the valve located behind or near the toilet. Turn it clockwise to shut off the water supply. If no valve is present, you will need to find another valve in your home’s basement area.
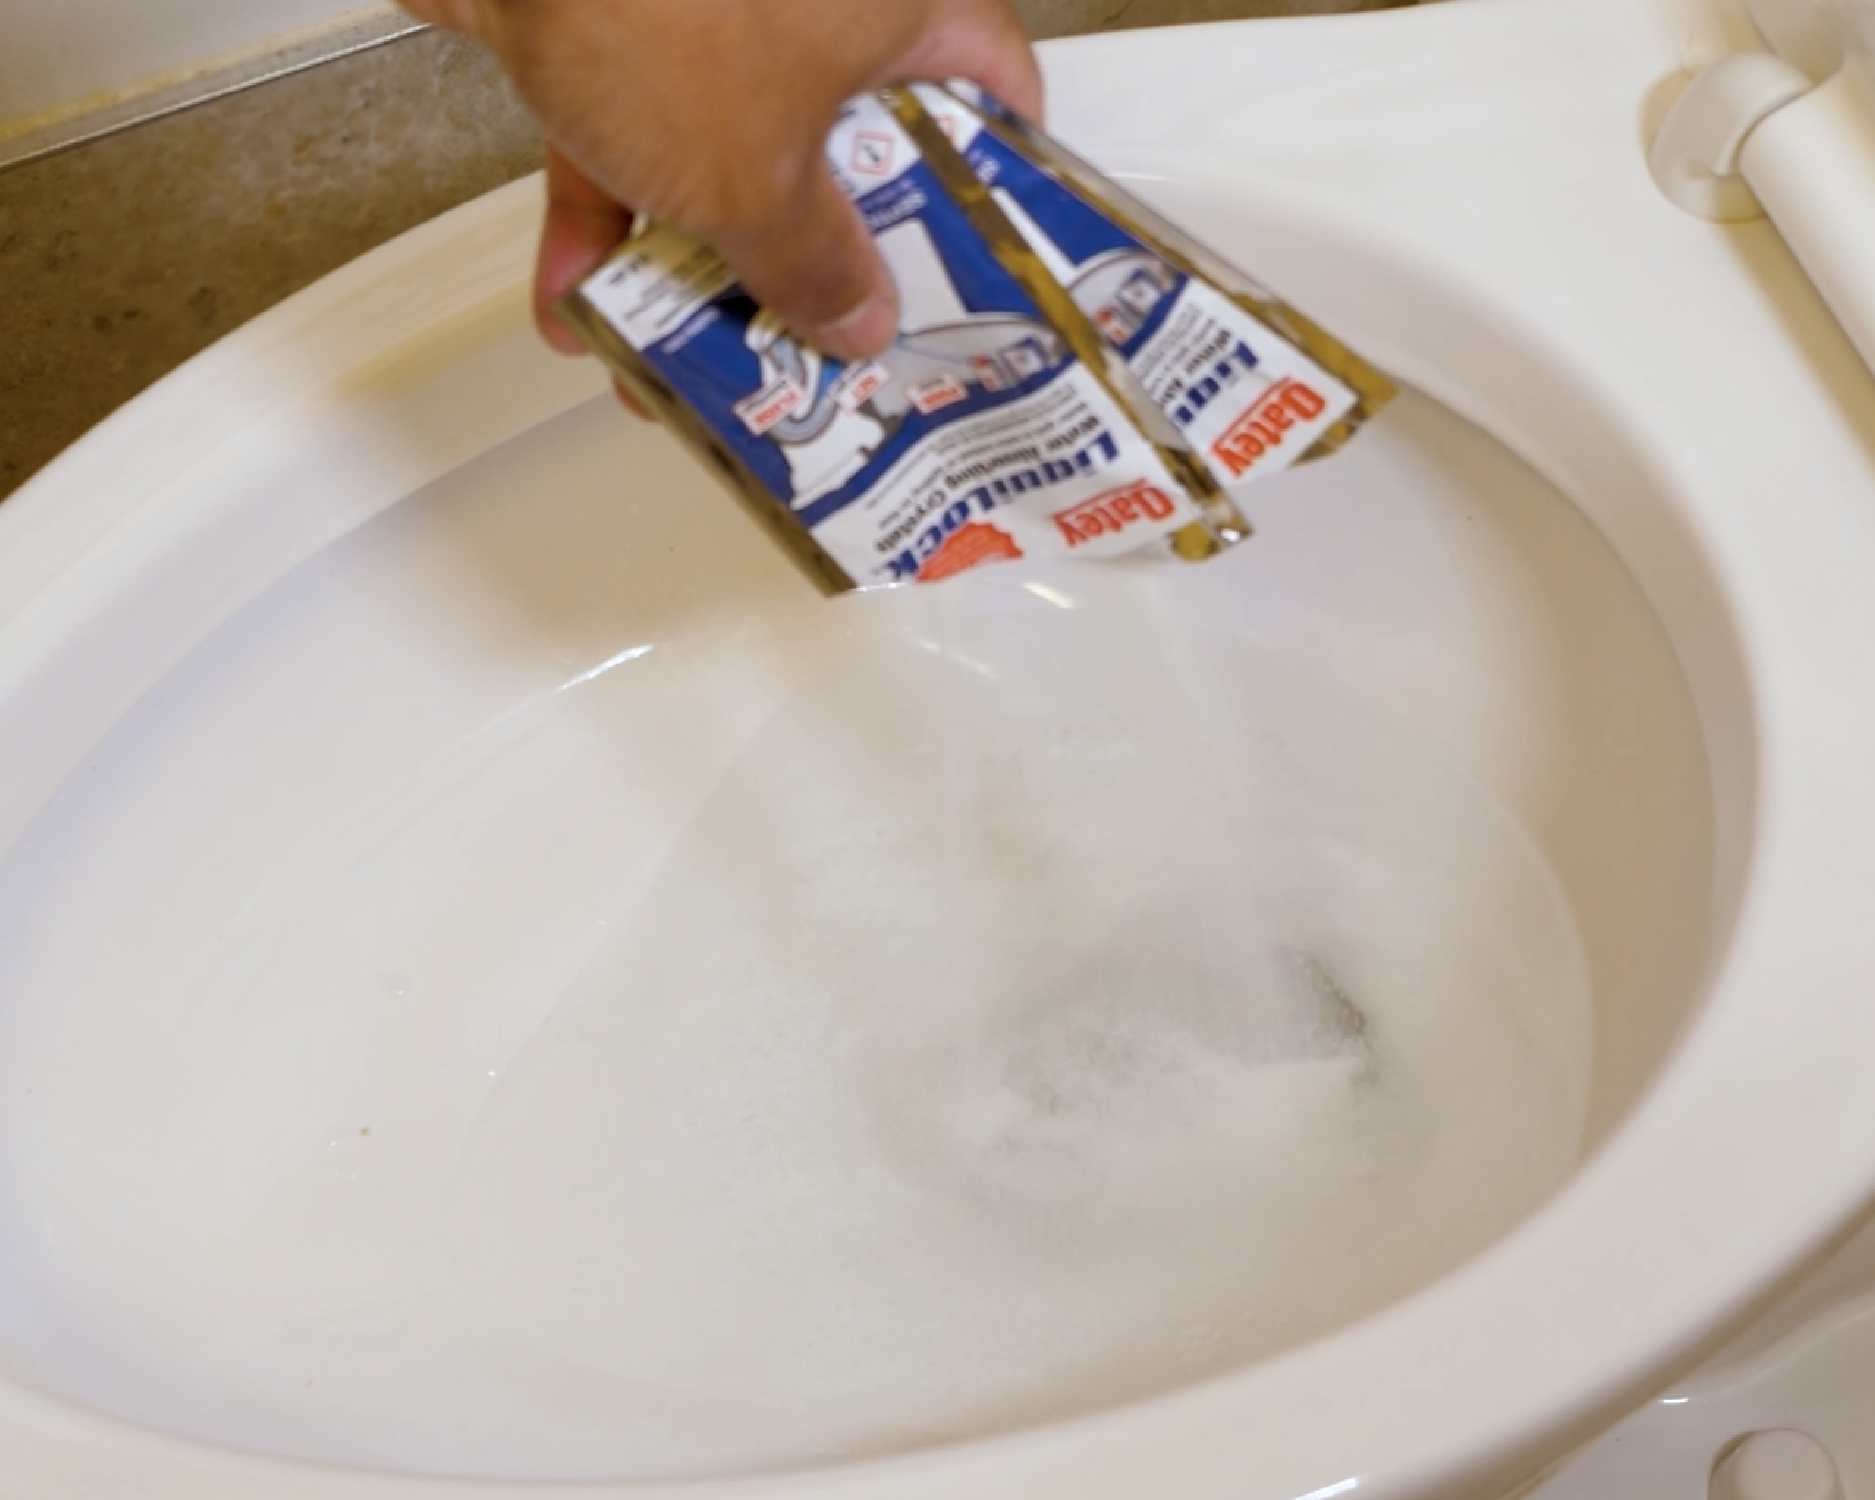
After that, lift the toilet tank lid and flush the toilet. Keep the handle down to empty as much water as possible from the tank and bowl. Remove any remaining water from the bowl using a sponge, or use Oatey LiquiLock to solidify the remaining water in the bowl temporarily.
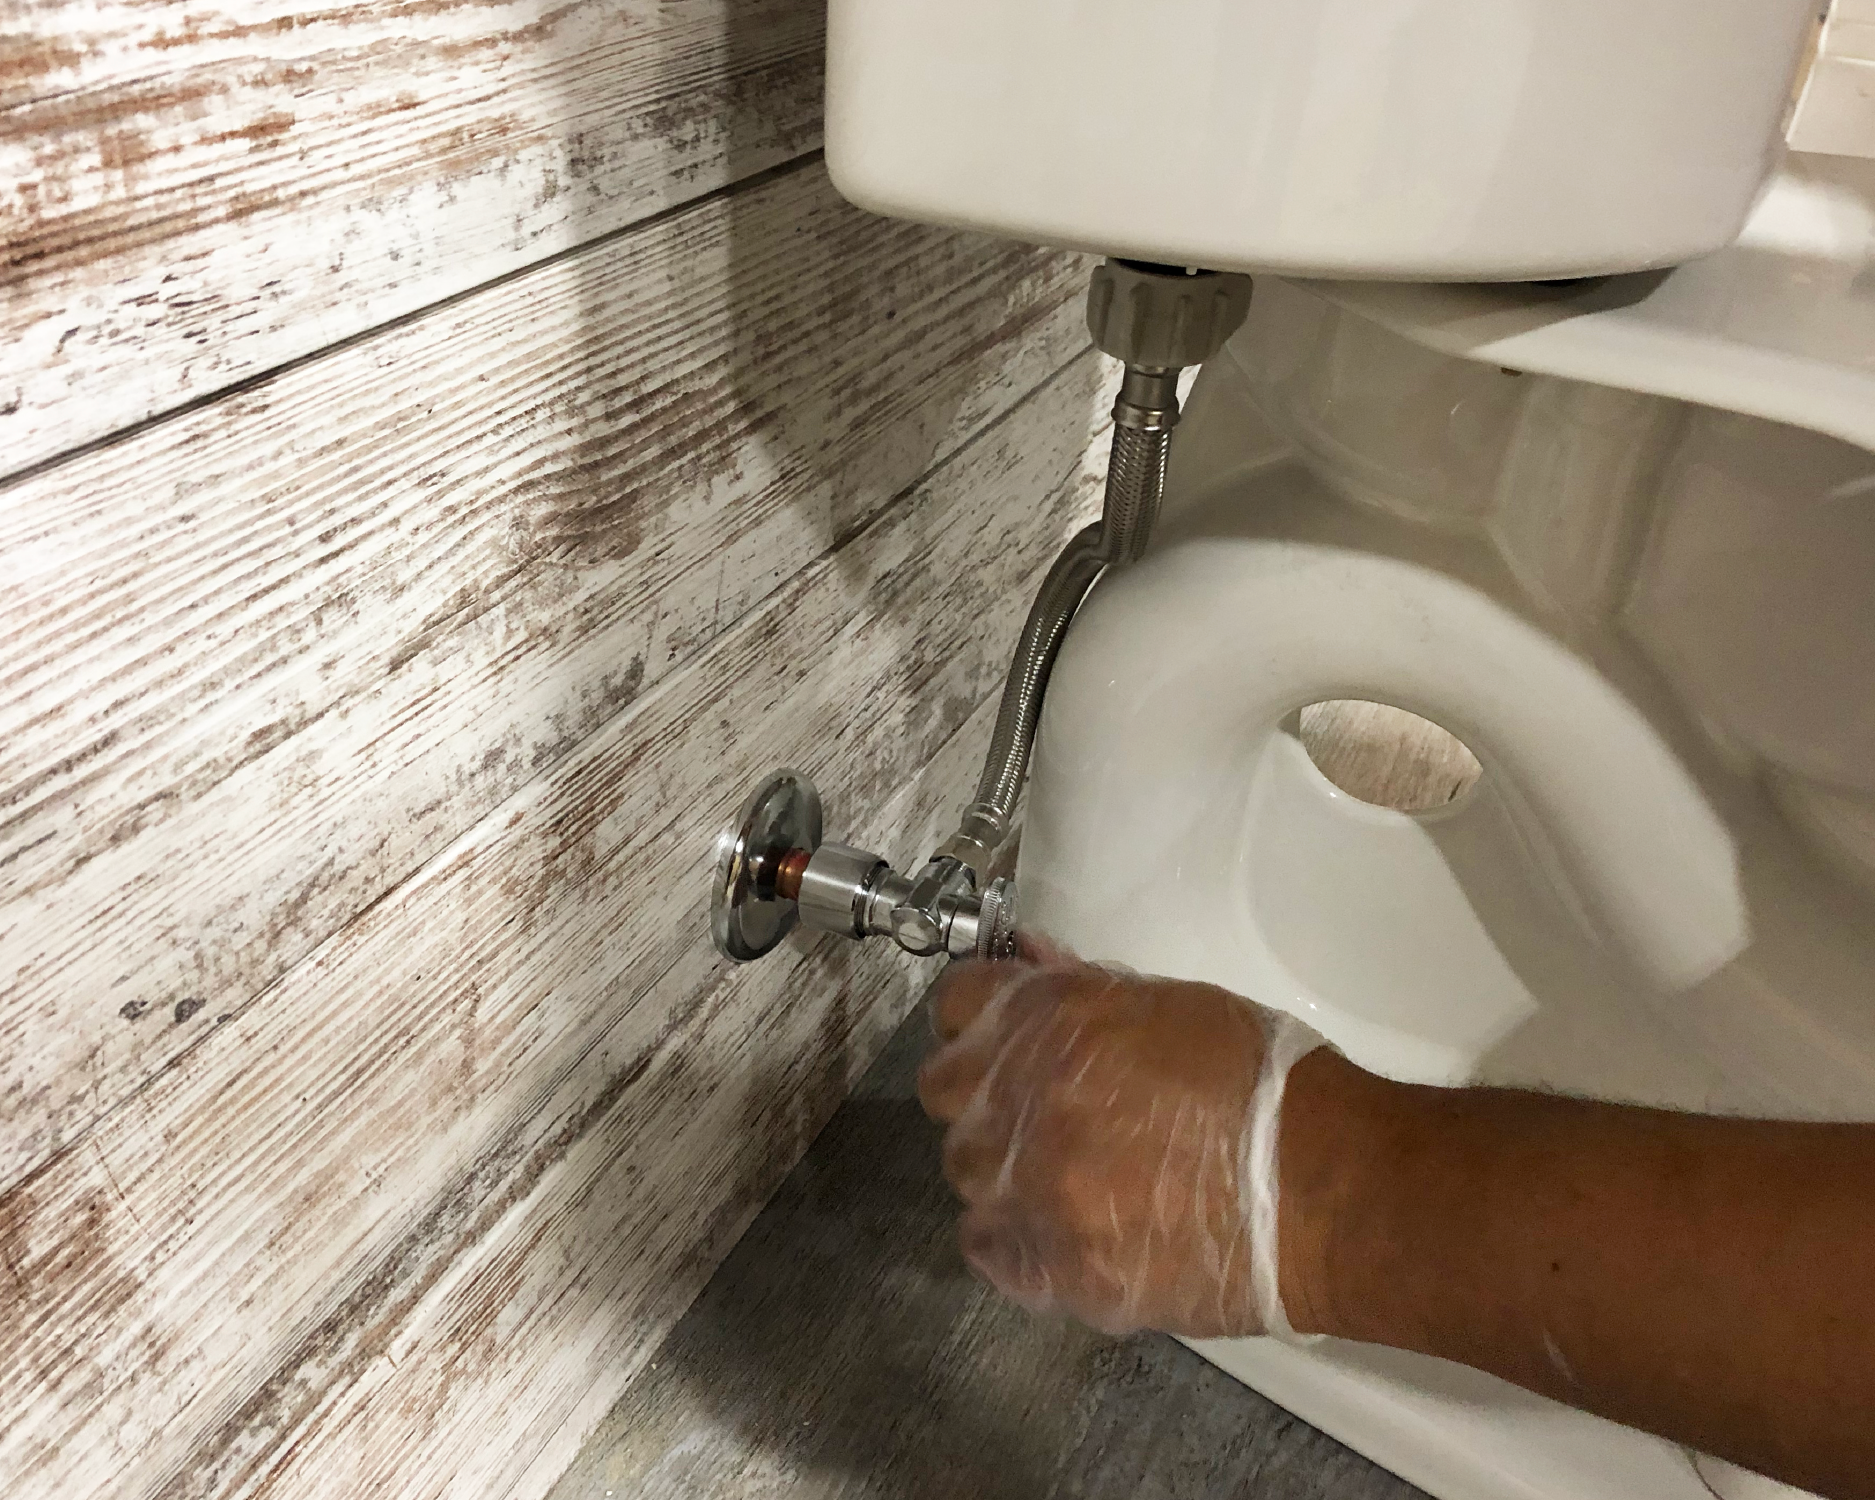
Step 2: Disconnect the Water Supply Tube
To disconnect the water supply tube from the toilet fill valve, loosen the ⅜-inch compression nut. This will help when resetting the toilet after the wax seal is replaced. Cover the bathroom floor or bathtub with a protective material, depending on where you plan to place the toilet while replacing the wax seal.
Next, remove the caps covering the bolts and washers by gently prying them upwards with a flathead screwdriver. Be cautious not to exert too much pressure on the china to avoid chipping or cracking.
Remove the nuts and washers from the bolts at the toilet base using an adjustable wrench. If the bolt spins while turning the nut, hold the bolt with a separate pair of pliers. If you are not using new bolts, nuts, and washers, store the existing ones to avoid losing them.
Note: We recommend that homeowners replace the toilet supply tube when replacing the toilet wax ring.
Step 3: Remove Your Toilet
To remove the toilet, grab the toilet under the sides of the bowl and rock it gently back and forth to break the old wax seal. Lift the toilet off the floor and set it on the protective covering. If the toilet is caulked to the finished floor, score the caulking around the toilet base with a razor knife.
Phase 2: Install the New Wax Ring
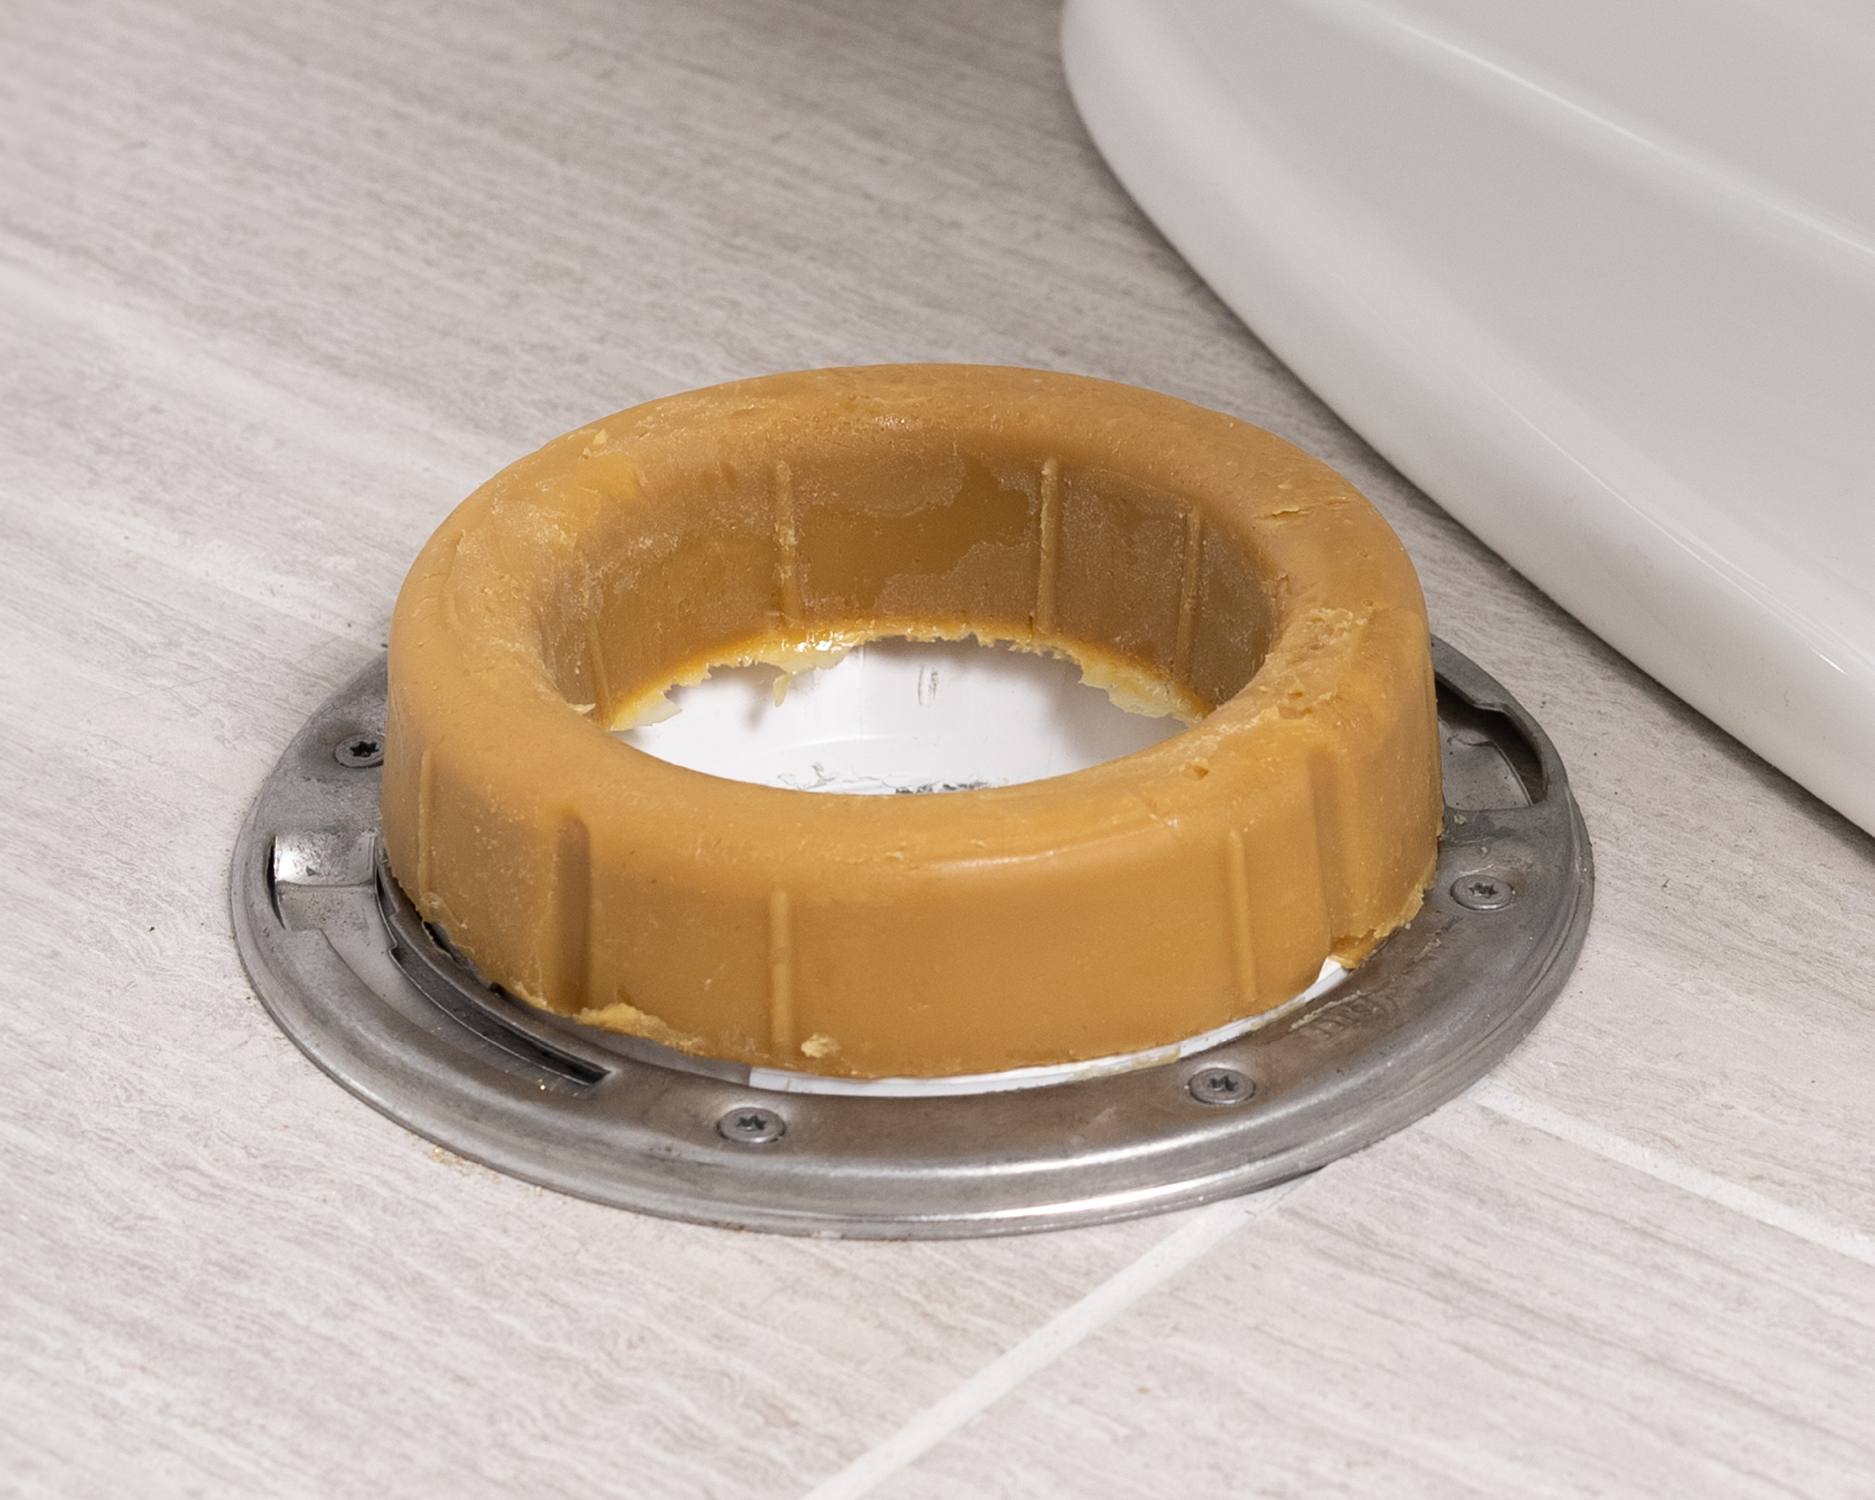
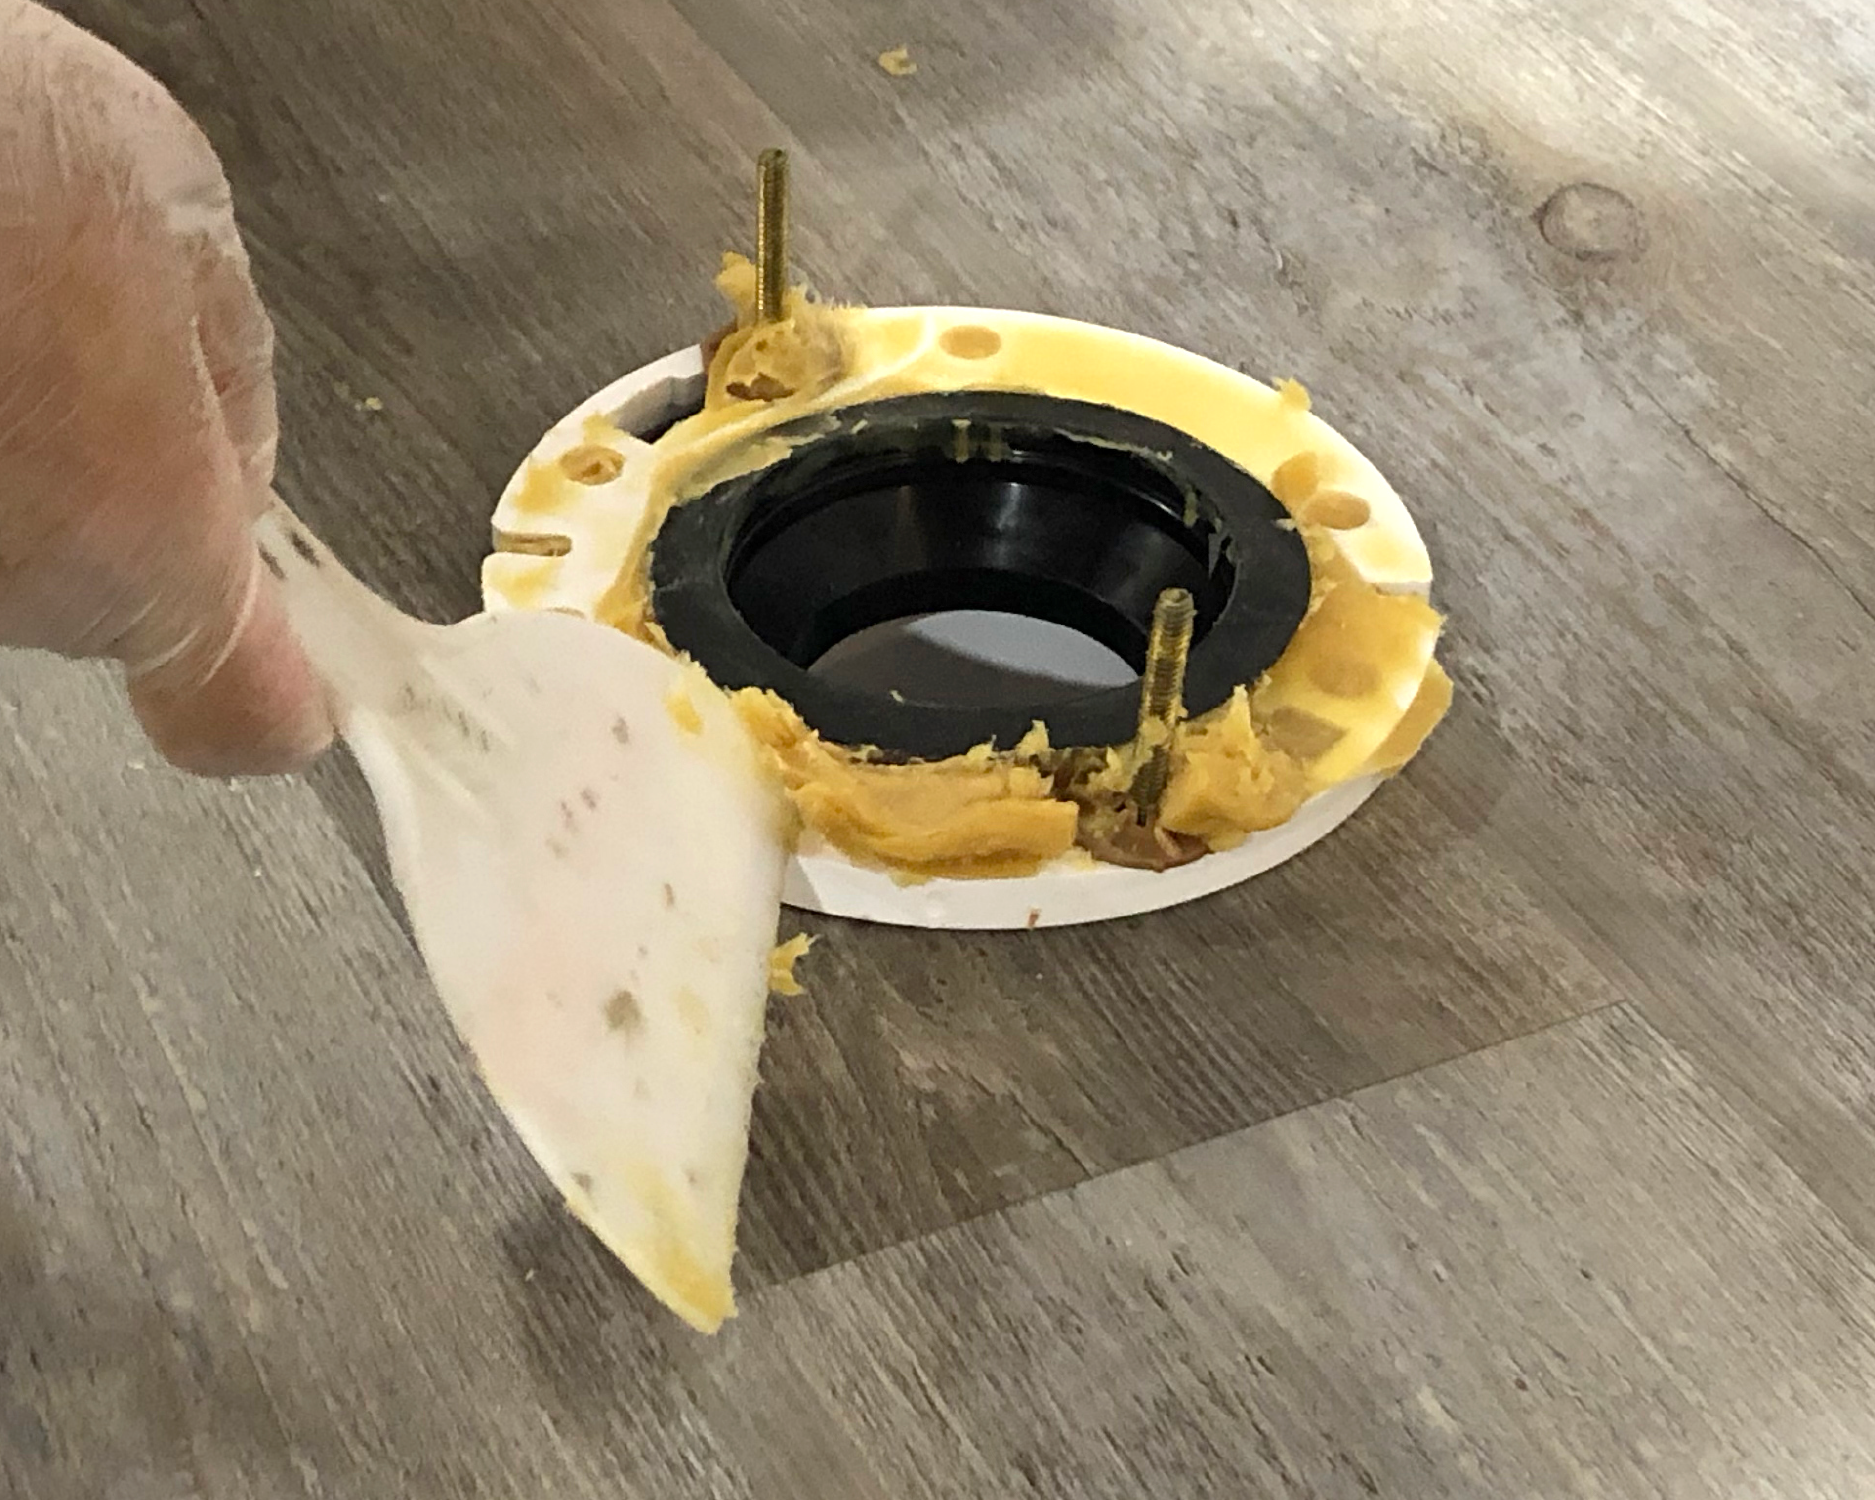
Step 1: Remove the Old Toilet Wax Ring
While wearing gloves, remove the old toilet wax ring. Using a putty knife, scrape the old wax seal off the toilet’s base and toilet flange. Next, scrape the caulk off the toilet bowl and finished floor. Before installing a new toilet wax ring, inspect the toilet flange for any cracks or decay.
After removing the old toilet wax ring, immediately plug the drain to prevent noxious sewer gas from entering your home. We recommend using a 3”- 4” gripper plug when the toilet will be removed for an extended time. If you plan to reinstall your toilet immediately, stuffing a large ball of rags into the pipe will suffice.
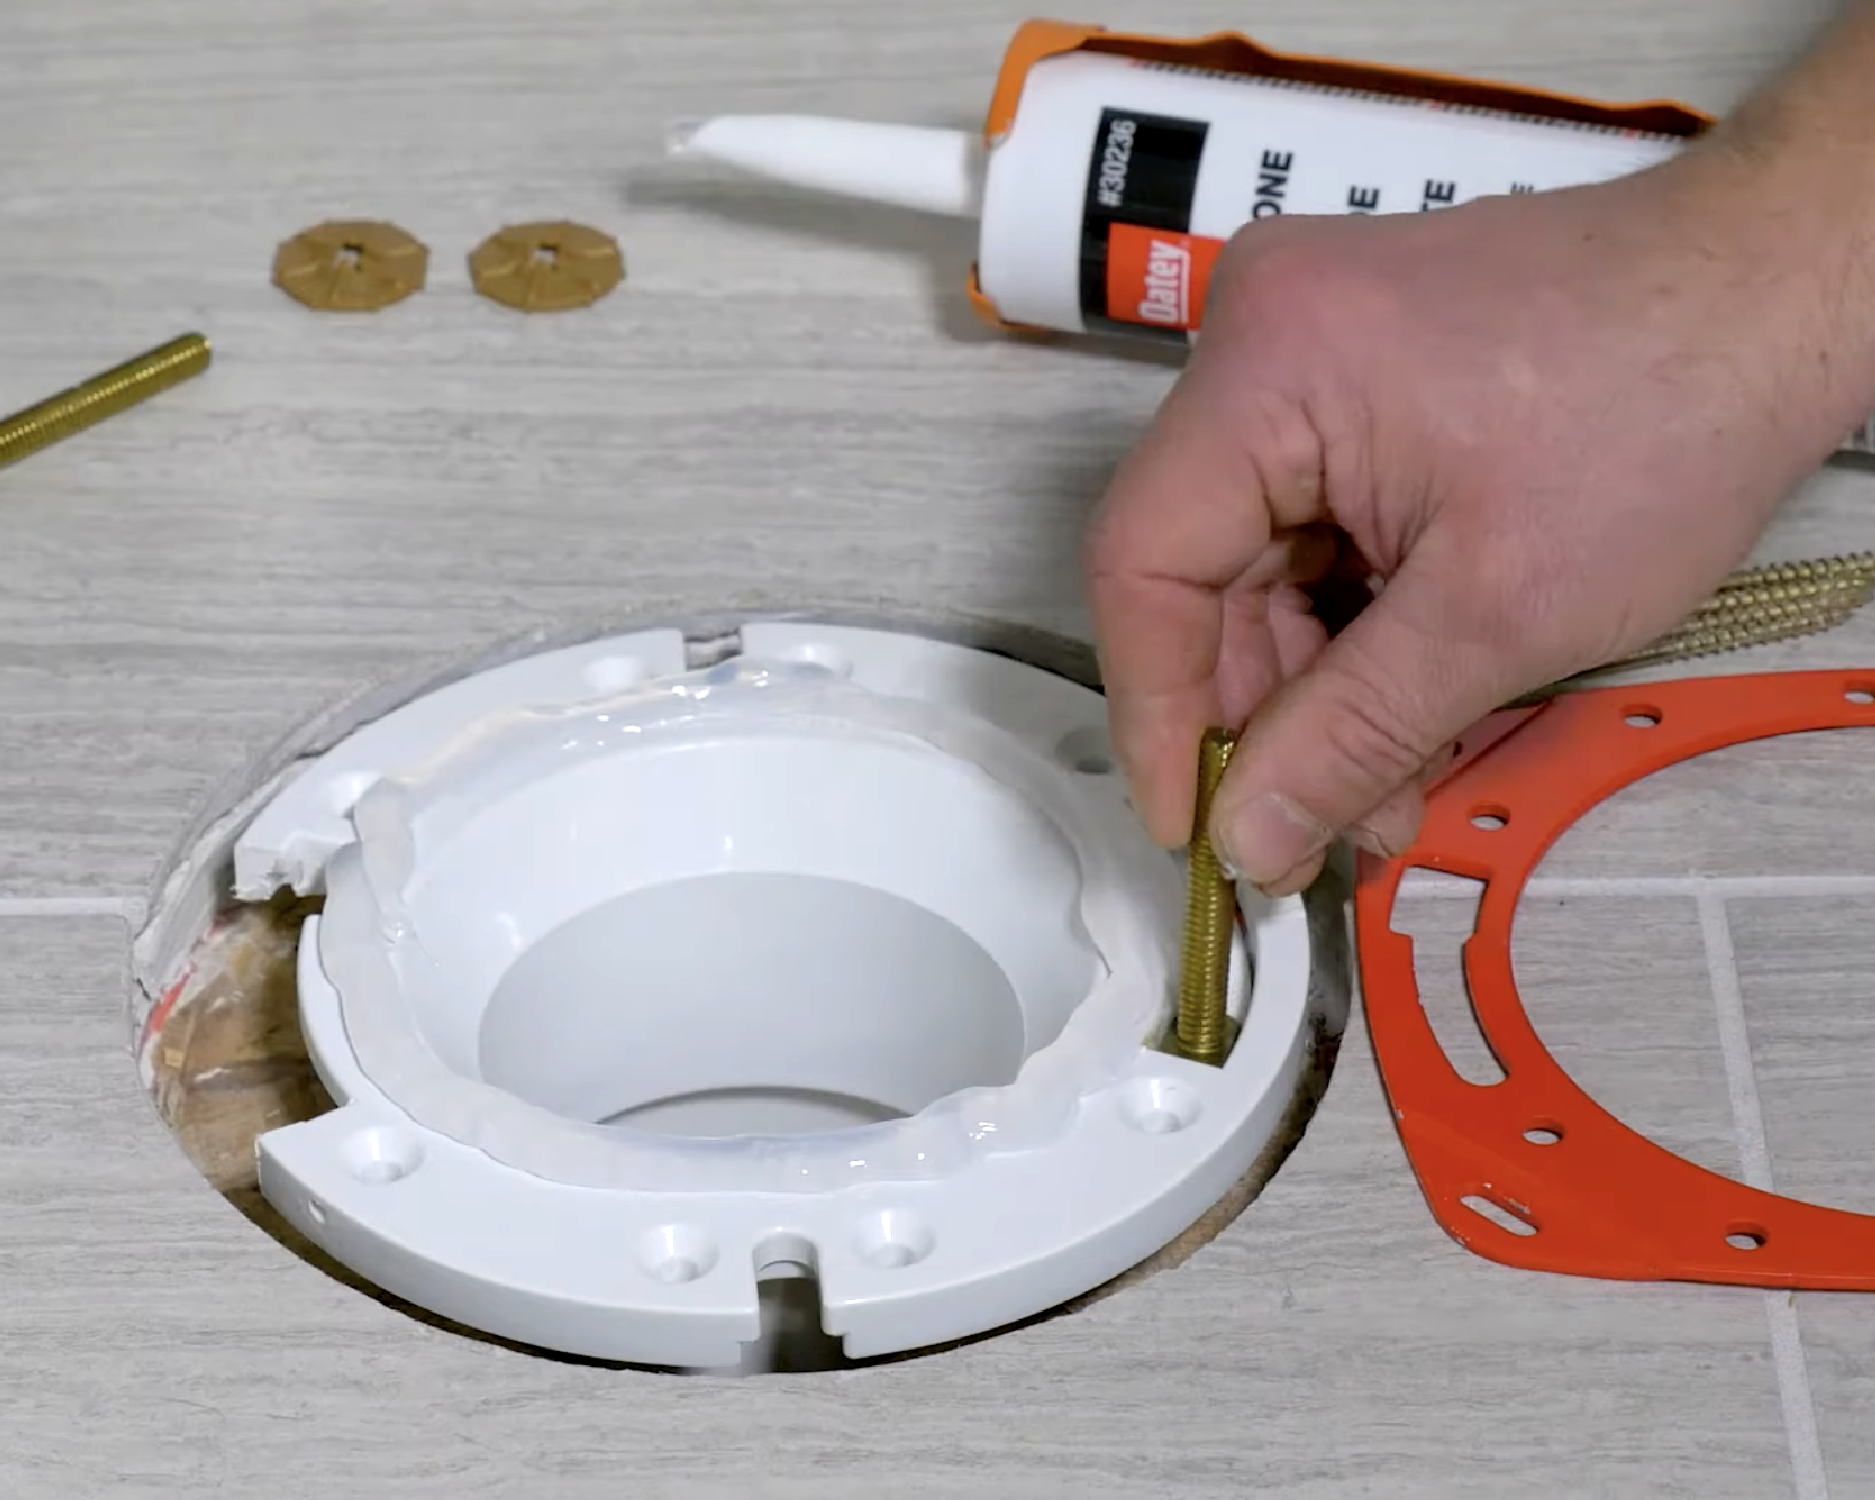
Step 2: Install New Bolts
When replacing your toilet’s wax ring, it’s recommended to install new bolts at the same time. Consider using the Hercules® Johni-bolt®, a brass closet bolt with a time-saving, snap-off slot and captive washer. They come in regular and extra-long lengths to accommodate multiple floor surfaces that require a longer bolt to secure the water closet to the existing flange.
If you intend to keep the existing bolts, ensure they are in good condition before you replace the toilet wax ring. Check that the bolts are centered with the toilet flange opening and parallel with the finished wall behind the toilet tank. Install any necessary repair parts or spacers before installing the new toilet mounting bolts.
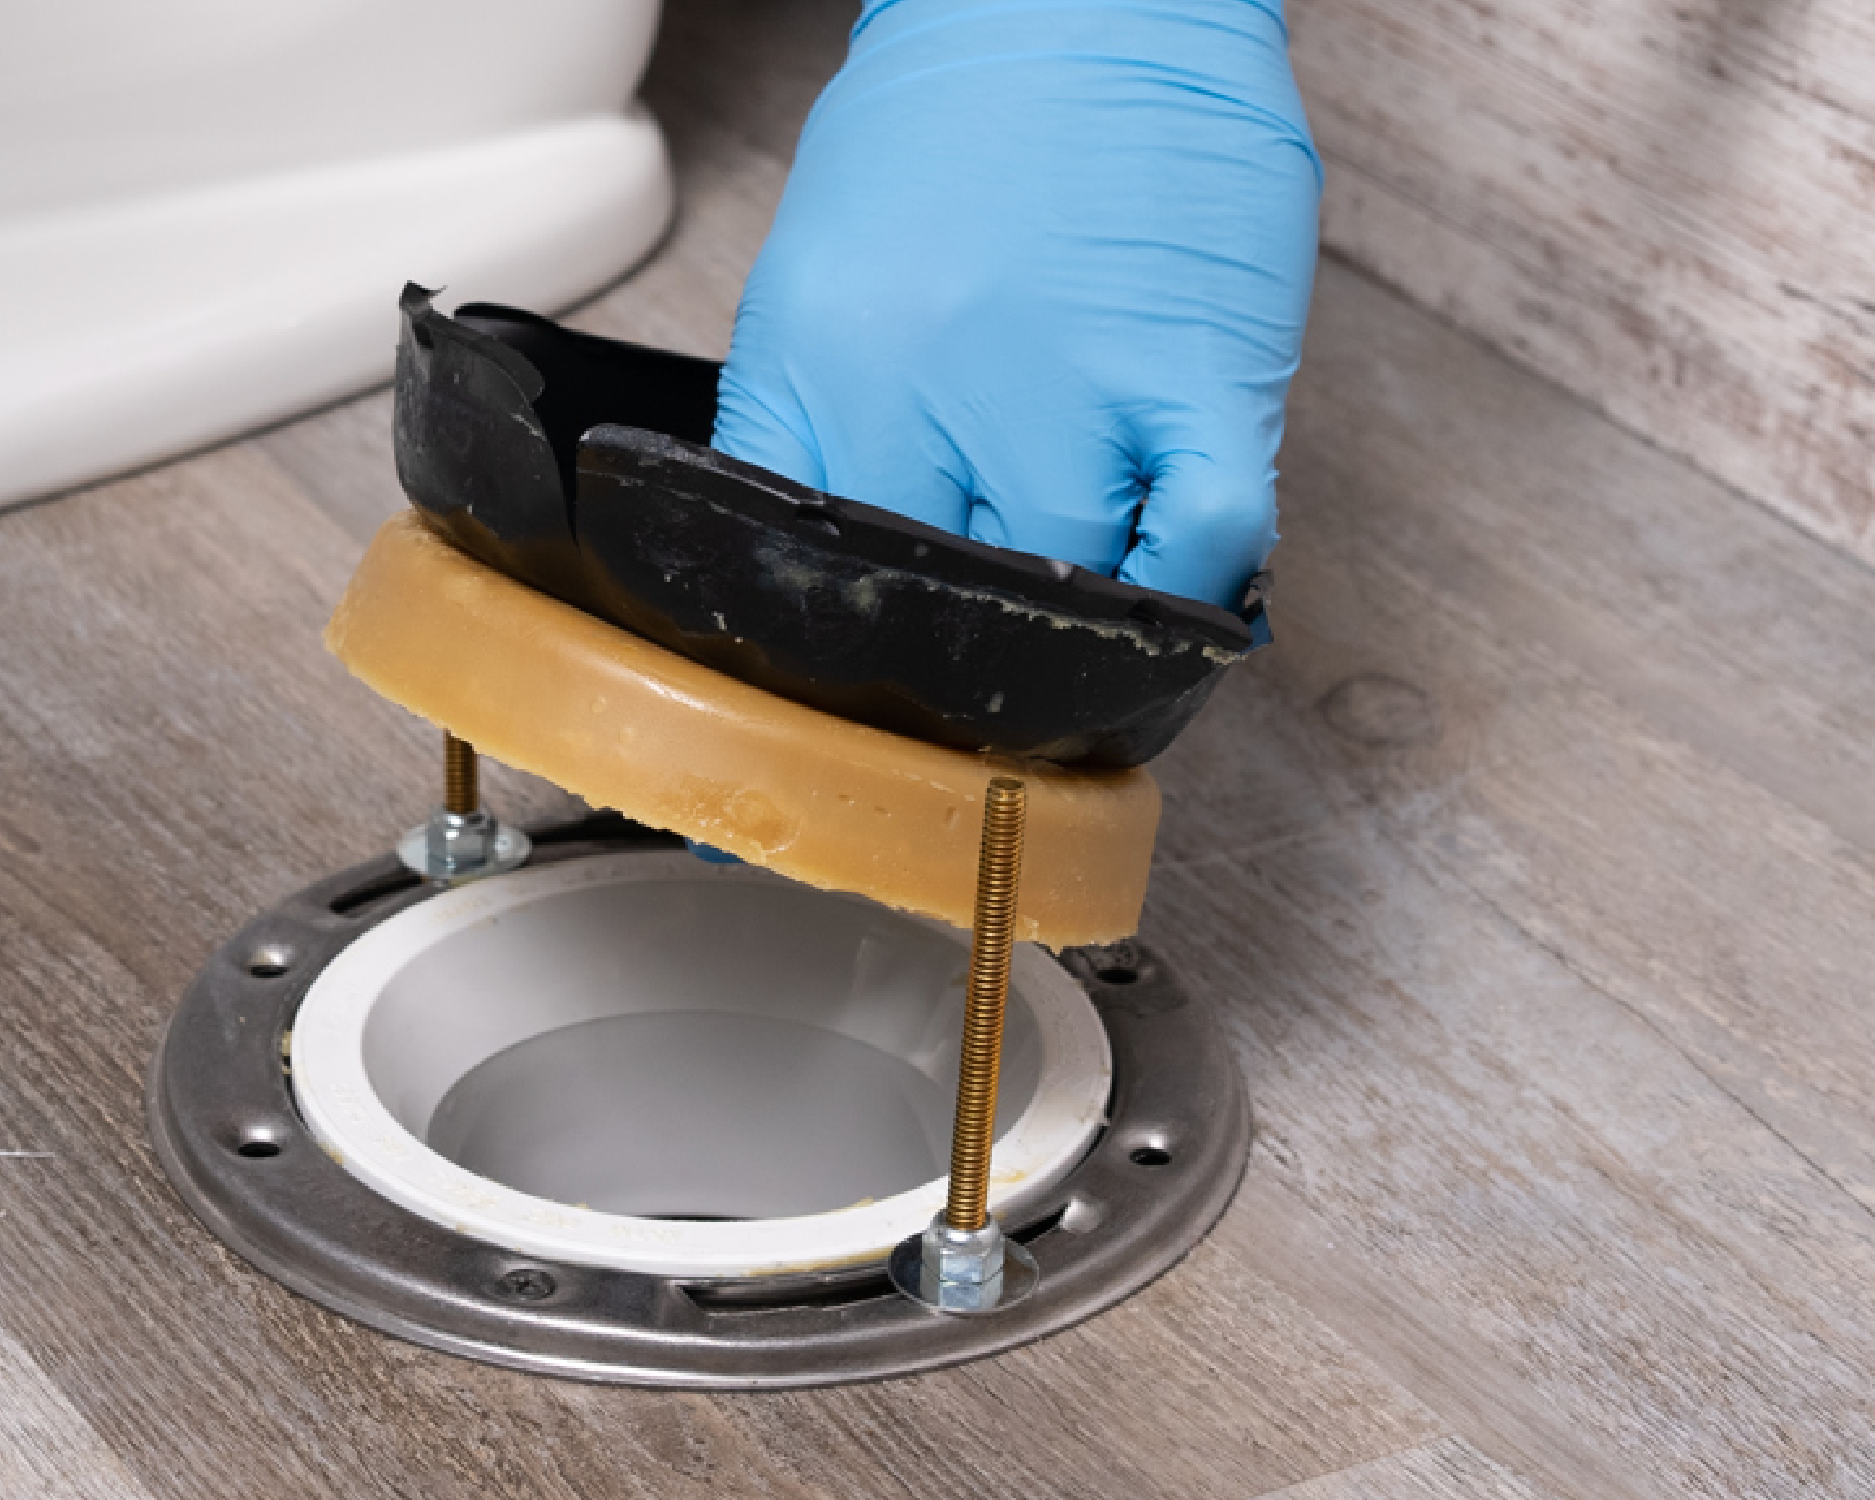
Step 3: Replace the Toilet Wax Ring
Now that the mounting bolts are secured, it’s time to replace the toilet wax ring. Position the new toilet wax ring on top of the toilet flange, ensuring it is centered.
Want to know more about choosing the correct wax ring size, crucial installation tips, and other frequently asked questions? Check out our Oatey 101: Wax Rings blog.
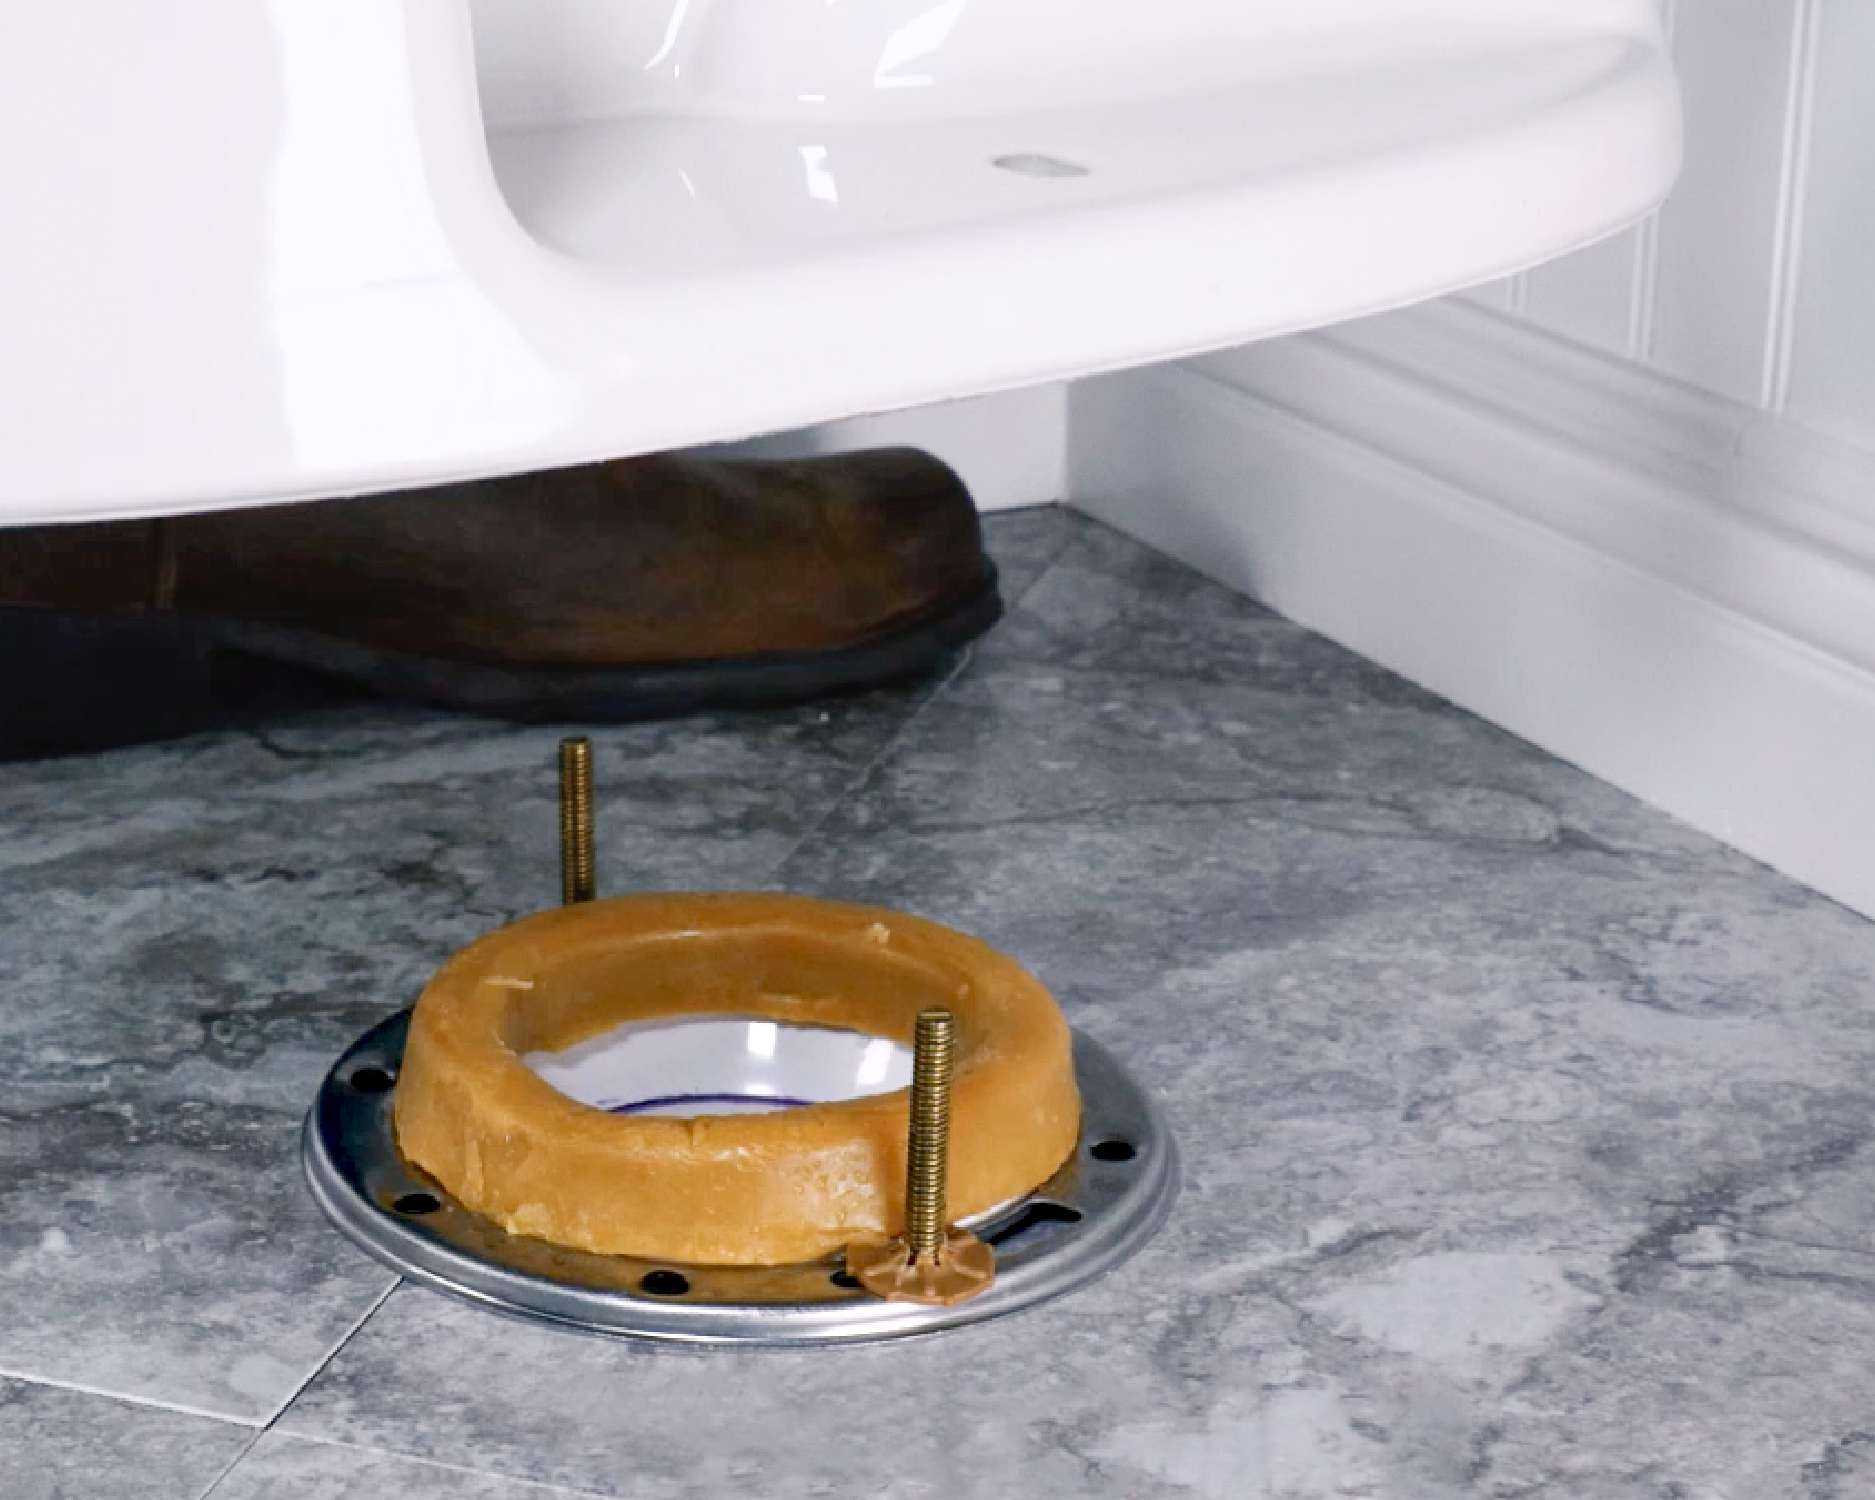
Step 4: Re-install the Toilet
When reinstalling the toilet, use the bolts as guides. Keep the tank parallel to the wall to ensure a level placement on the new wax ring. Do not rock the toilet as you place it onto the new toilet wax ring. Instead, use a slight side-to-side twisting motion until the toilet bowl rests on the finished bathroom floor.
Tip: If the toilet bowl isn't level, use toilet shims.
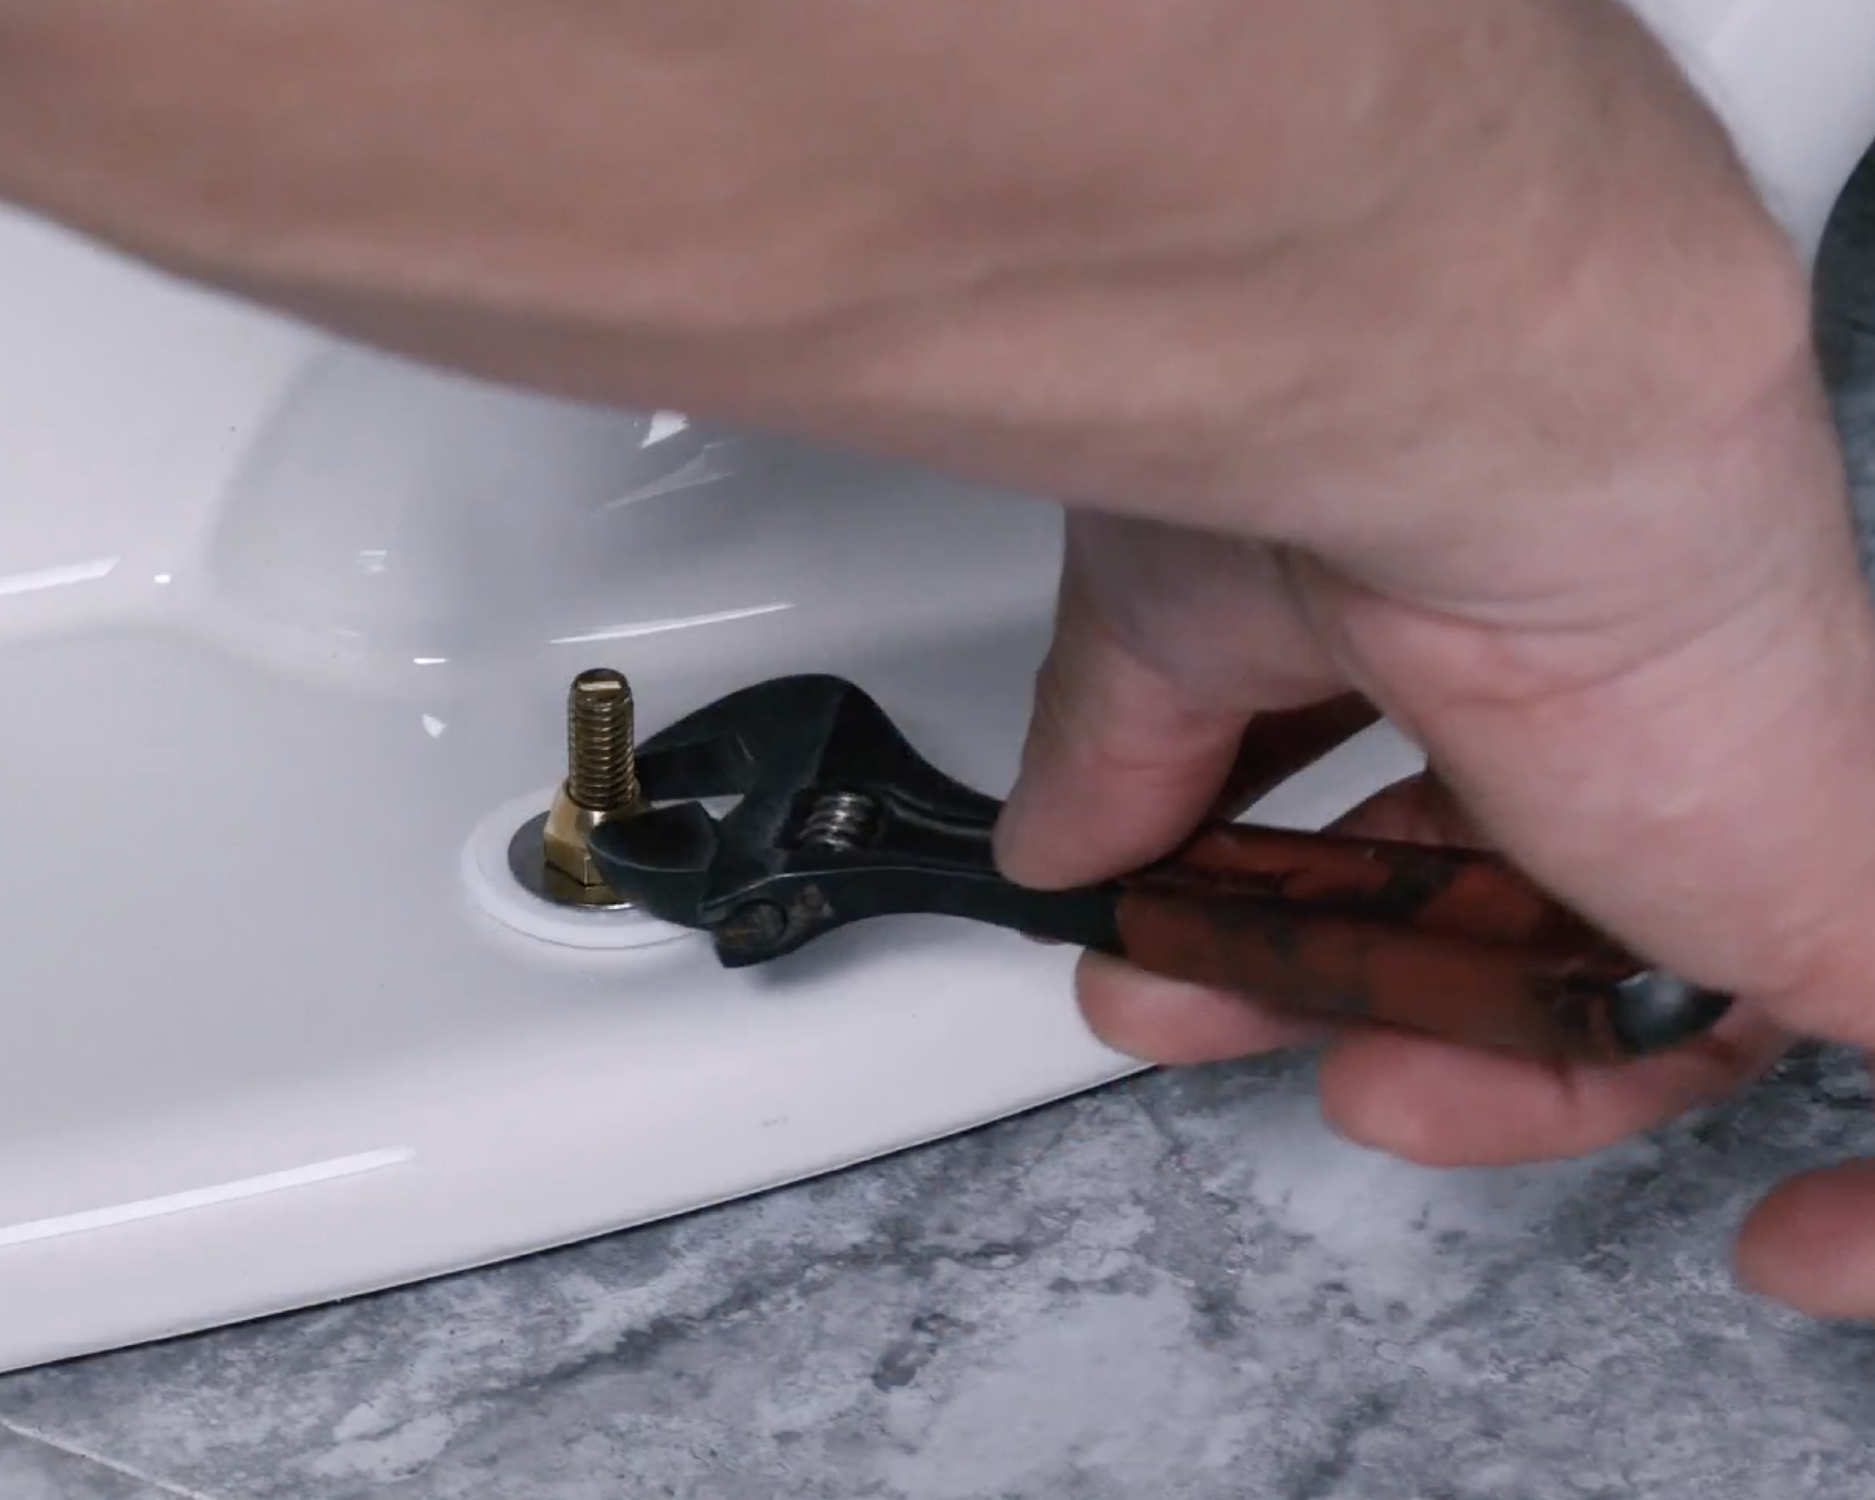
Step 5: Secure the Toilet
Reinstall the washers and bolts in their original order and location. Tighten the bolts while alternating from side to side until the toilet bowl is securely and evenly set on the finished floor. Avoid overtightening the bolts, which can lead to damaging or cracking the toilet bowl. If necessary, saw off any excess bolt length, then add the decorative caps.
Note: Stop tightening the nuts as soon as they’re snugly in place, and keep the toilet from moving or rocking. Too much torque can crack the porcelain or damage the drain flange.
Step 6: Connect the Water Supply
After reinstallation, turn on the water and let the tank fill before flushing. If you used LiquiLock to solidify the water, follow the instructions on the package when reintroducing new water into the toilet bowl.
Position tissues or toilet paper around the entire base of the toilet bowl where it meets the finished floor. Then, flush the toilet multiple times. If you detect water on the tissues or paper, the wax seal isn't correctly installed, and you will have to remove the toilet and start the installation over with a new wax seal.

Step 7: Inspect for Leaks
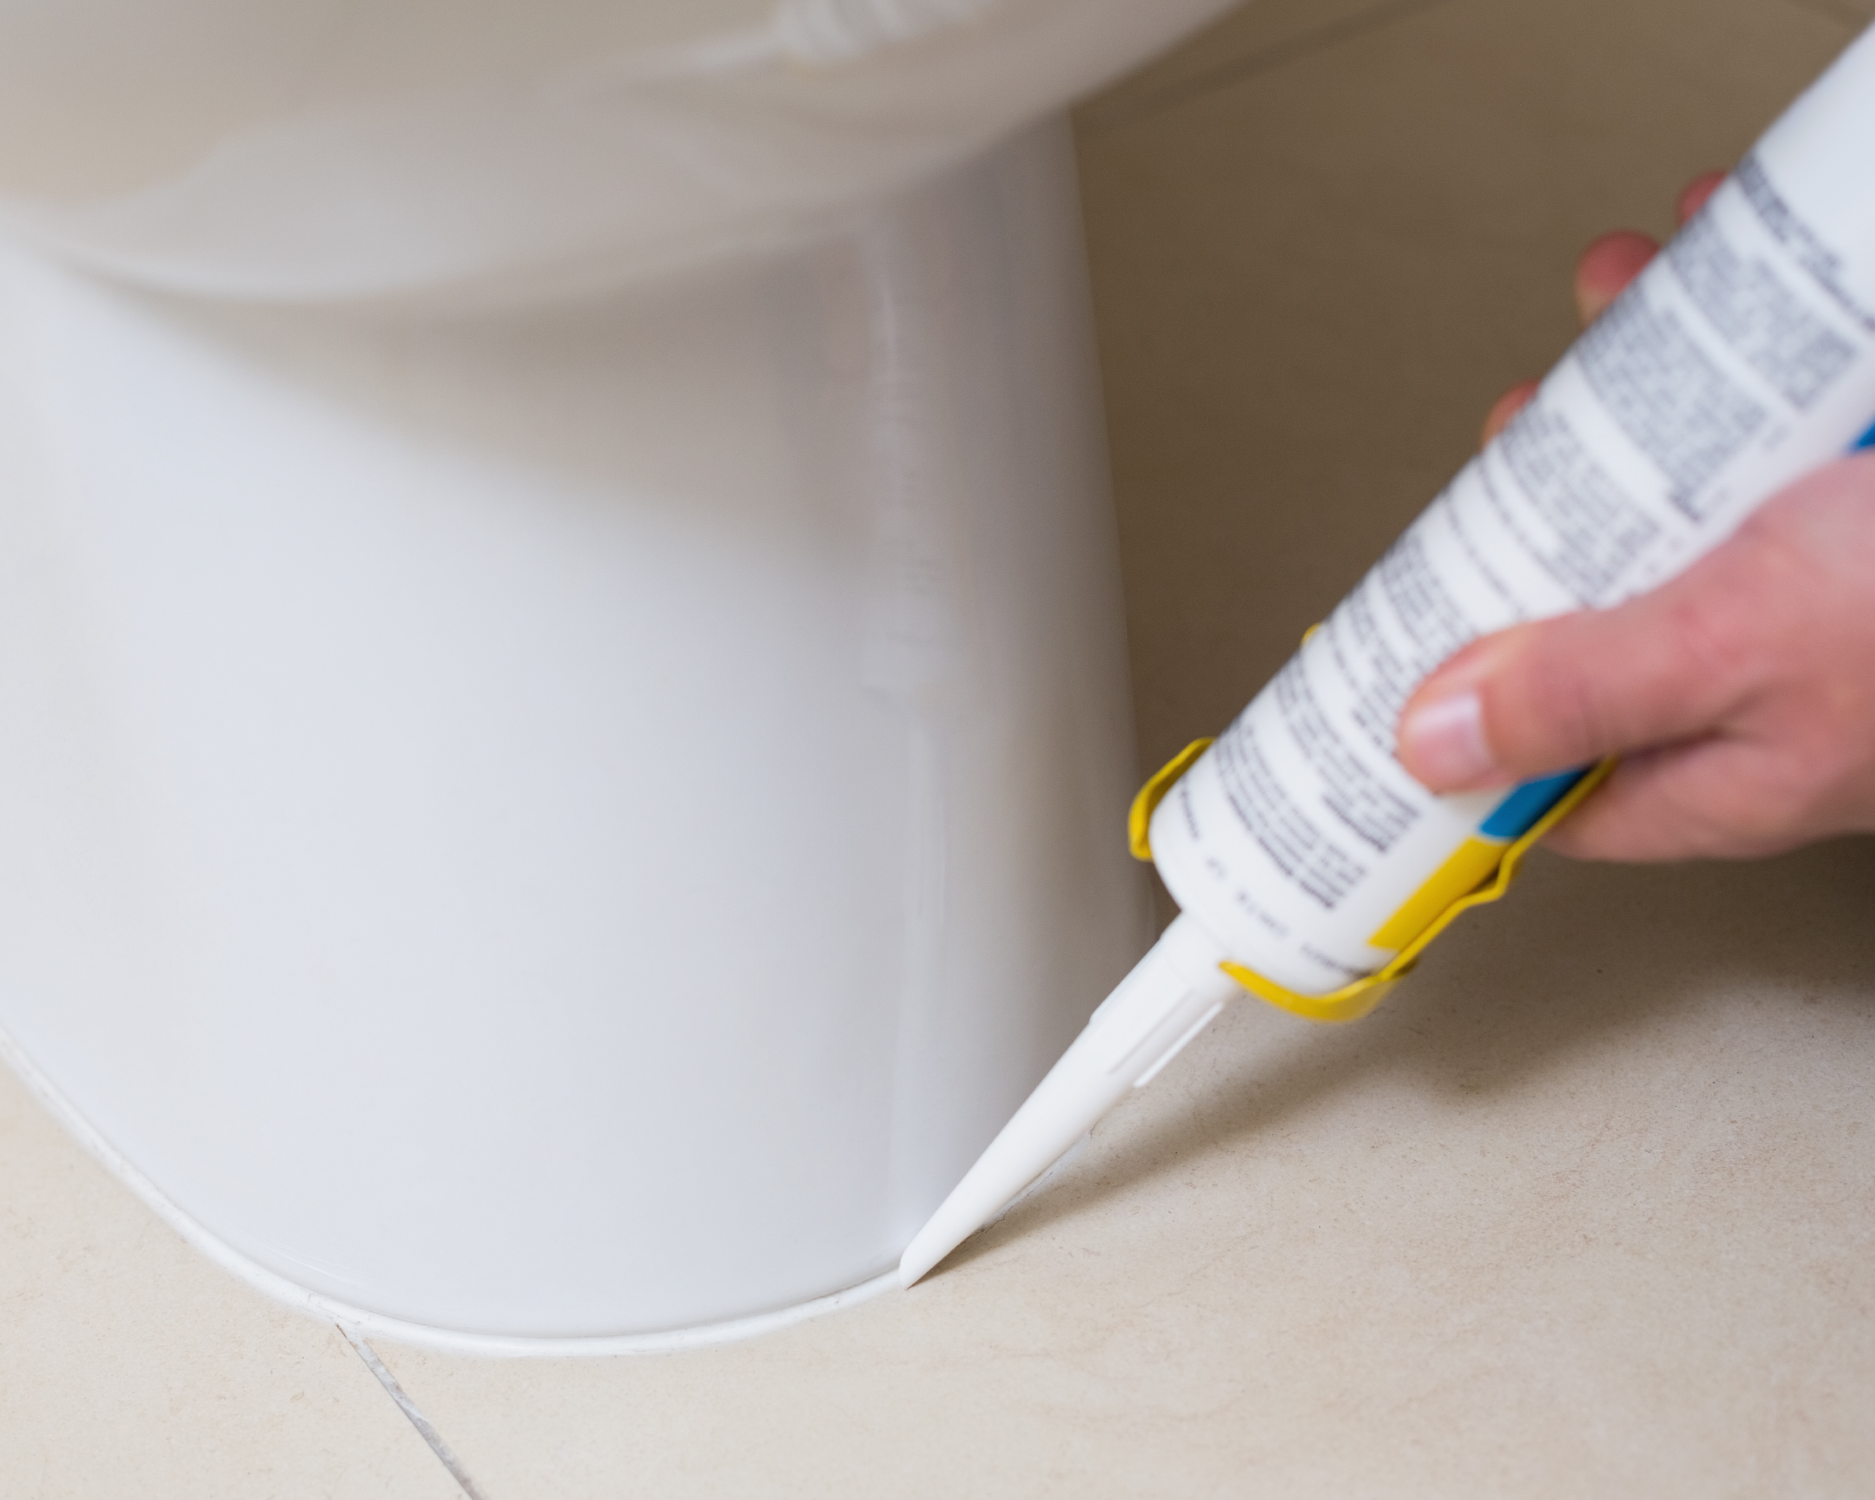
If you do not see any leaks, caulk the toilet bowl to the finished flooring. If a leak is detected, identify the source as soon as possible before floor damage can occur. For insurance against leaks, replace the water supply line linking your toilet to the water shut-off valve coming through the wall or floor.
Need more help? Check out this step-by-step video tutorial on replacing a toilet wax ring.